
mojo's Blog
SQLite 프로그래밍 본문
안드로이드 앱에서 SQLite를 사용할 떄는 일반적으로 SQLiteOpenHelper 클래스, SQLiteDatabase 클래스, Cursor 인터페이스를 활용한다.
우선 SQLiteOpenHelper 클래스를 상속받아서 새로운 클래스를 생성한다.
생성한 클래스에는 데이터베이스 파일과 테이블을 생성하는 내용을 코딩한다.
SQLiteOpenHelper 클래스의 getWritableDatabase() 를 사용하면 SQLiteDatabase를 반환하고, execSQL() 또는 rawQuery() 등으로 SQL문을 실행한다.
특히 SELECT 문은 cursor 인터페이스를 반환받은 후에 반복해서 테이블의 행 데이터에 접근하게 된다.
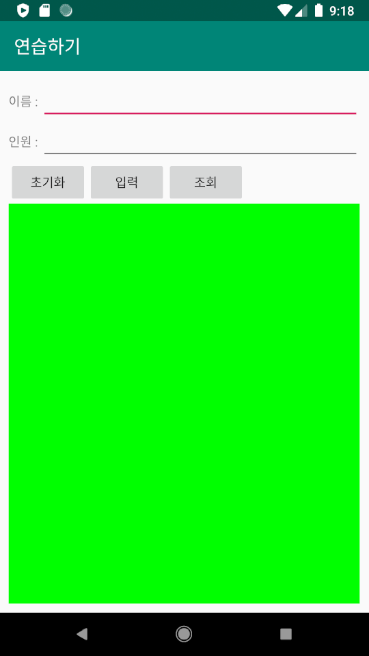
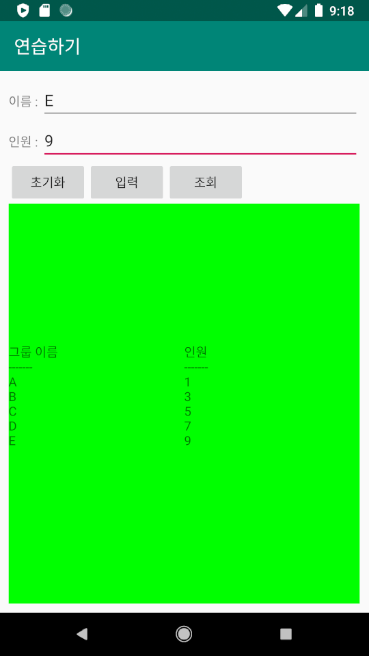
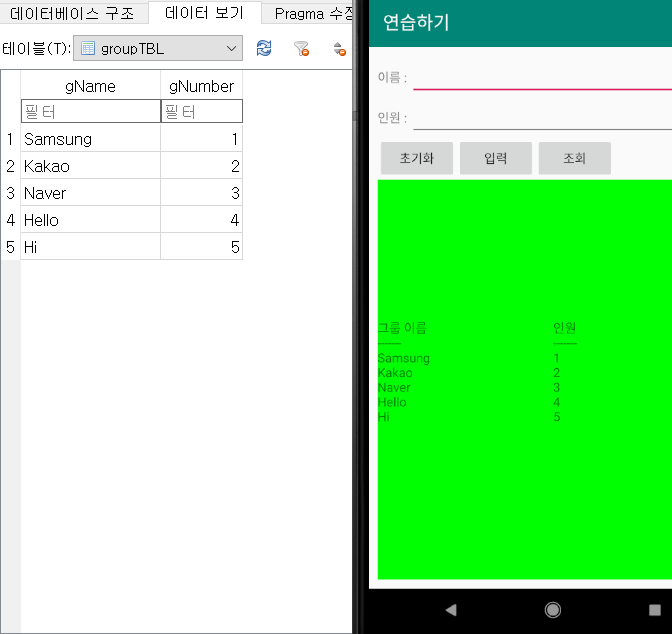
연습하기 ) 그룹 관리 DB 만들기
activity_main.xml Code
<?xml version="1.0" encoding="utf-8"?>
<LinearLayout xmlns:android="http://schemas.android.com/apk/res/android"
    xmlns:app="http://schemas.android.com/apk/res-auto"
    xmlns:tools="http://schemas.android.com/tools"
    android:layout_width="match_parent"
    android:layout_height="match_parent"
    android:padding="10dp"
    android:orientation="vertical">

    <LinearLayout
        android:layout_width="match_parent"
        android:layout_height="wrap_content"
        android:orientation="horizontal">
        <TextView
            android:layout_width="wrap_content"
            android:layout_height="wrap_content"
            android:text="이름 : "/>
        <EditText
            android:layout_width="match_parent"
            android:layout_height="wrap_content"
            android:layout_weight="1"
            android:id="@+id/edit1"/>
    </LinearLayout>

    <LinearLayout
        android:layout_width="match_parent"
        android:layout_height="wrap_content"
        android:orientation="horizontal">
        <TextView
            android:layout_width="wrap_content"
            android:layout_height="wrap_content"
            android:text="인원 : "/>
        <EditText
            android:layout_width="match_parent"
            android:layout_height="wrap_content"
            android:layout_weight="1"
            android:id="@+id/edit2"/>
    </LinearLayout>

    <LinearLayout
        android:layout_width="match_parent"
        android:layout_height="wrap_content"
        android:orientation="horizontal">
        <Button
            android:layout_width="wrap_content"
            android:layout_height="wrap_content"
            android:text="초기화"
            android:id="@+id/btn1"/>
        <Button
            android:layout_width="wrap_content"
            android:layout_height="wrap_content"
            android:text="입력"
            android:id="@+id/btn2"/>
        <Button
            android:layout_width="wrap_content"
            android:layout_height="wrap_content"
            android:text="조회"
            android:id="@+id/btn3"/>
    </LinearLayout>

    <LinearLayout
        android:layout_width="match_parent"
        android:layout_height="match_parent"
        android:orientation="horizontal"
        android:gravity="center"
        android:background="#00ff00">
        <TextView
            android:layout_width="match_parent"
            android:layout_height="wrap_content"
            android:layout_weight="1"
            android:id="@+id/editResult1"/>
        <TextView
            android:layout_width="match_parent"
            android:layout_height="wrap_content"
            android:layout_weight="1"
            android:id="@+id/editResult2"/>
    </LinearLayout>

</LinearLayout>
MainActivity.java Code
public class MainActivity extends AppCompatActivity {
    myDBHelper myHelper;
    EditText edit1,edit2;
    TextView text1, text2;
    Button btnInit, btnEnter, btnShow;
    SQLiteDatabase sqlDB;

    @Override
    protected void onCreate(Bundle savedInstanceState) {
        super.onCreate(savedInstanceState);
        setContentView(R.layout.activity_main);
        setTitle("연습하기");

        edit1 = (EditText)findViewById(R.id.edit1);
        edit2 = (EditText)findViewById(R.id.edit2);
        text1 = (TextView) findViewById(R.id.editResult1);
        text2 = (TextView) findViewById(R.id.editResult2);
        btnInit = (Button)findViewById(R.id.btn1);
        btnEnter = (Button)findViewById(R.id.btn2);
        btnShow = (Button)findViewById(R.id.btn3);

        myHelper = new myDBHelper(this);

        btnInit.setOnClickListener(new View.OnClickListener() {
            @Override
            public void onClick(View view) {
                sqlDB = myHelper.getWritableDatabase();
                myHelper.onUpgrade(sqlDB, 1, 2);
                sqlDB.close();
            }
        });

        btnEnter.setOnClickListener(new View.OnClickListener() {
            @Override
            public void onClick(View view) {
                sqlDB = myHelper.getWritableDatabase();
                sqlDB.execSQL("INSERT INTO groupTBL VALUES ( '"
                                + edit1.getText().toString() + "', "
                                + edit2.getText().toString() + ");");
                sqlDB.close();
                Toast.makeText(getApplicationContext(), "입력완료", Toast.LENGTH_SHORT).show();
            }
        });

        btnShow.setOnClickListener(new View.OnClickListener() {
            @Override
            public void onClick(View view) {
                sqlDB=myHelper.getReadableDatabase();
                Cursor cursor;
                cursor = sqlDB.rawQuery("SELECT * FROM groupTBL;",null);

                String strNames = "그룹 이름"+"\r\n"+"-------"+"\r\n";
                String strNumbers = "인원"+"\r\n"+"-------"+"\r\n";

                while(cursor.moveToNext()){
                    strNames += cursor.getString(0) + "\r\n";
                    strNumbers += cursor.getString(1) + "\r\n";
                }

                text1.setText(strNames);
                text2.setText(strNumbers);

                sqlDB.close();
            }
        });
    }

    public class myDBHelper extends SQLiteOpenHelper{

        public myDBHelper(Context context){
            super(context, "groupDB", null, 1);
        }

        @Override
        public void onCreate(SQLiteDatabase sqLiteDatabase) {
            sqLiteDatabase.execSQL("CREATE TABLE groupTBL(gName CHAR(20) PRIMARY KEY, gNumber INTEGER);");
        }

        @Override
        public void onUpgrade(SQLiteDatabase sqLiteDatabase, int i, int i1) {
            sqLiteDatabase.execSQL("DROP TABLE IF EXISTS groupTBL");
            onCreate(sqLiteDatabase);
        }
    }

}
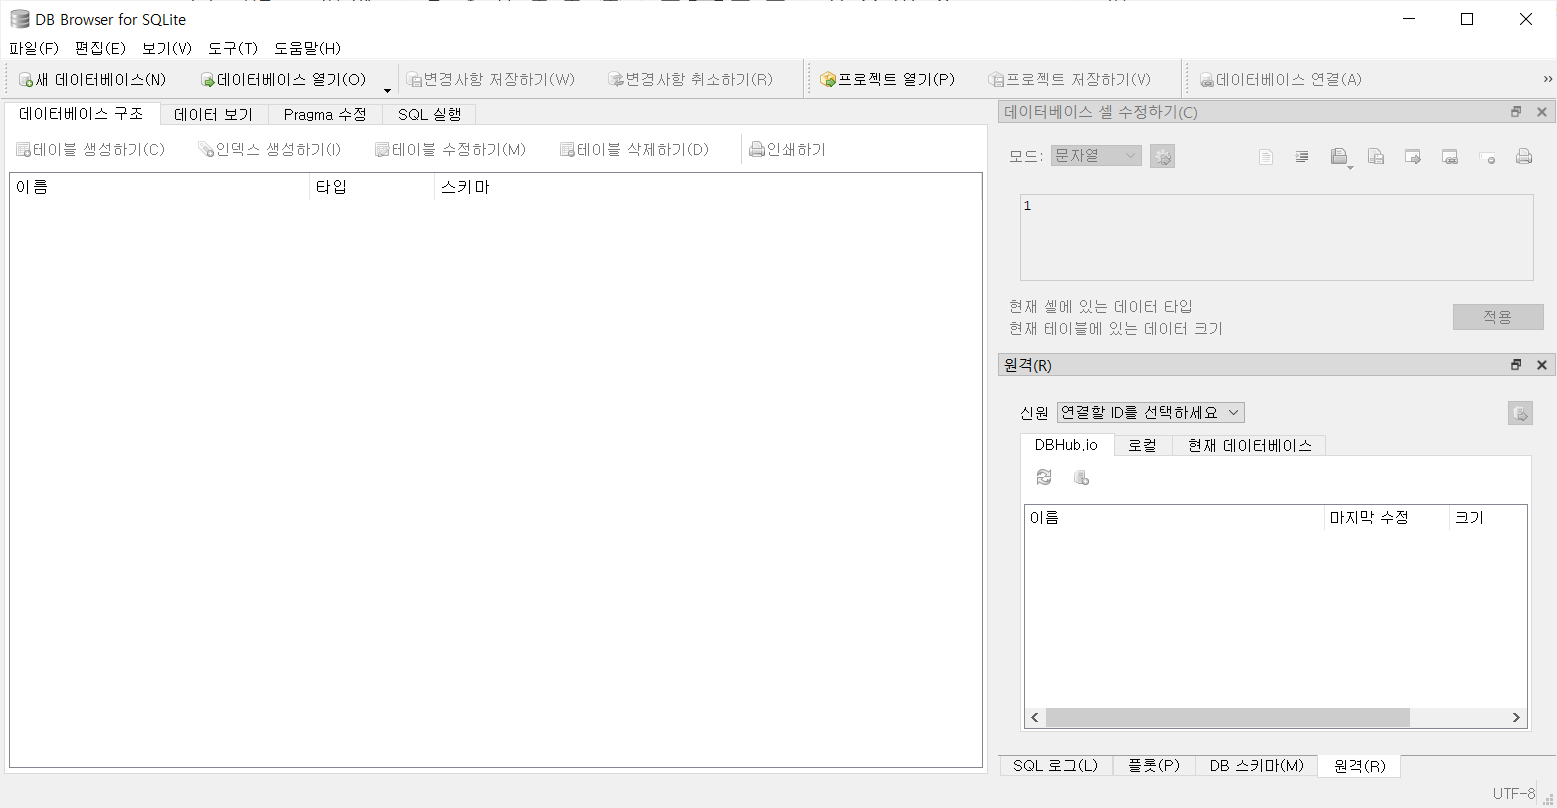
DB Browser for SQLite
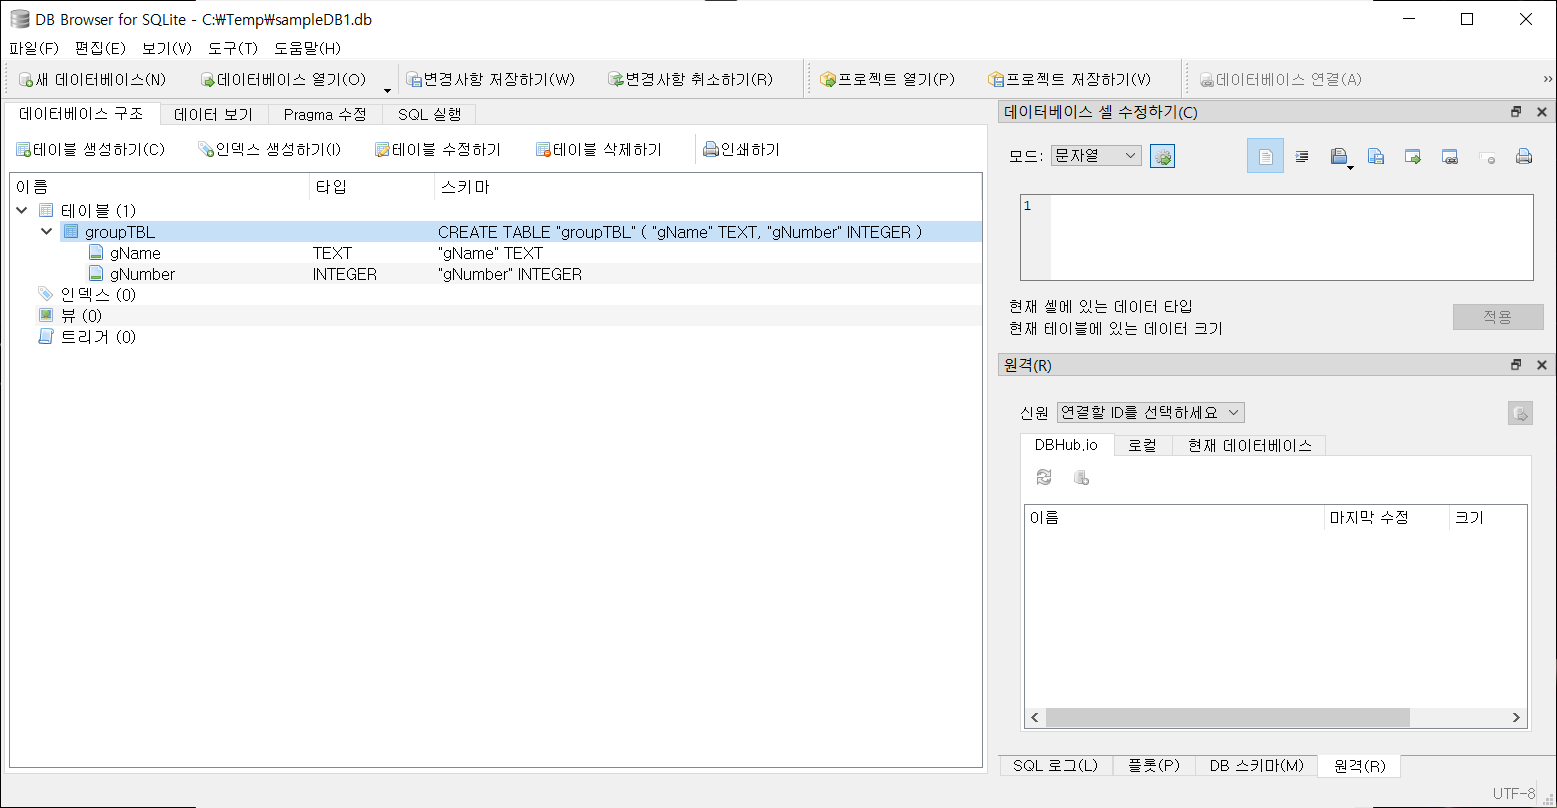
SQLite에 접근할 때 DB Browser for SQLite 라는 GUI 를 이용하면 편리하다.
DB Browser for SQLite 는 Releases · sqlitebrowser/sqlitebrowser · GitHub 에서 무료로 다운로드 가능하다.
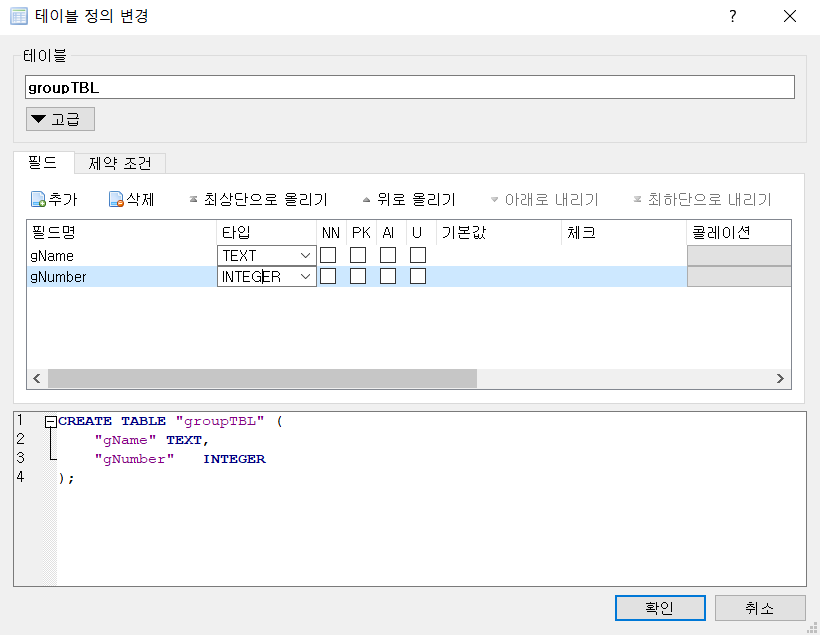
먼저 메뉴의 [파일]-[새 데이터베이스]를 선택하고 [저장하려는 파일명을 고르세요] 창에서 데이터베이스 파일이 저장될 경로와 파일명을 지정하고 <저장>을 클릭한다.
그리고 테이블을 생성하고 열을 지정하고 모두 생성한 후에 <OK> 를 클릭한다.
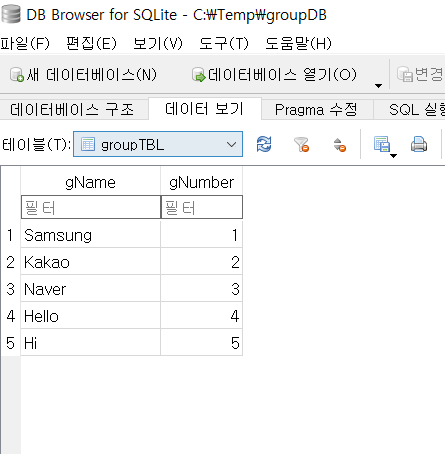
데이터를 입력하려면 [데이터 보기] 탭을 클릭하고 <새 레코드> 를 클릭하고 데이터를 입력한다.

행 데이터를 모두 입력했으면 [파일] - [변경사항 저장하기] 를 선택하여 변경 사항을 저장한다.
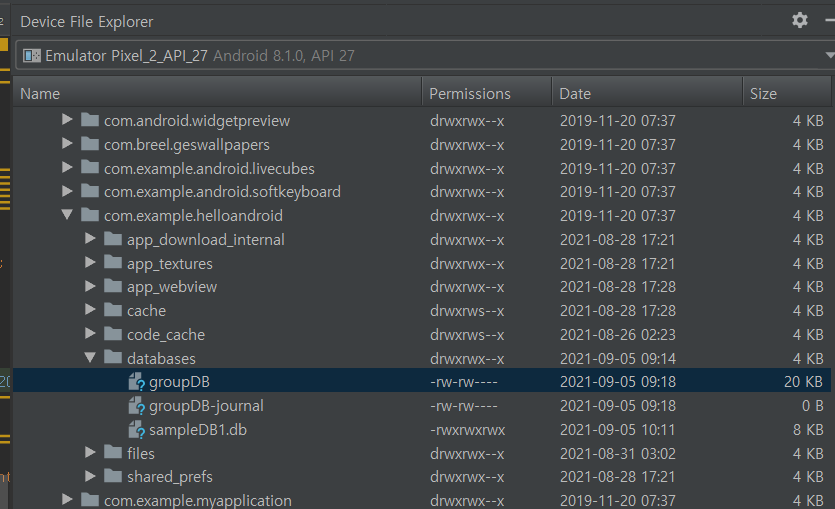
생성한 데이터베이스 파일을 Device File Explorer 를 통해 AVD 에 넣어서 사용하면 된다.
연습하기 ) 작성한 데이터베이스를 AVD에 넣어서 실행하기
DB 경로는 [View] - [Tools] - [Device File Explorer] 를 클릭한 후에 [data] - [data] - [com.example.프로젝트명] - [databases] 에 들어가면 DB 가 존재한다.
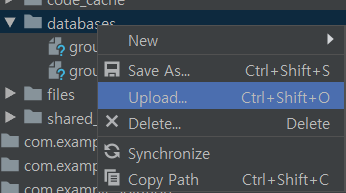
DB Browser에서 수정한 DB 파일은 [databases] 를 오른쪽 클릭을 하면 upload가 있다.
upload를 클릭하고 수정한 DB를 클릭하고 다시 실행한다.
정상적으로 된 것을 알 수 있다.
'Android' 카테고리의 다른 글
| Audio (0) | 2021.09.07 |
|---|---|
| 데이터베이스 기본 개념 알아가기 (0) | 2021.09.05 |
| 갤러리와 스피너 (0) | 2021.09.05 |
| 리스트뷰와 그리드뷰 (0) | 2021.09.04 |
| 안드로이드 프로그래밍 제 10장 연습문제 6번 (0) | 2021.09.04 |

