
mojo's Blog
Composite Pattern 본문
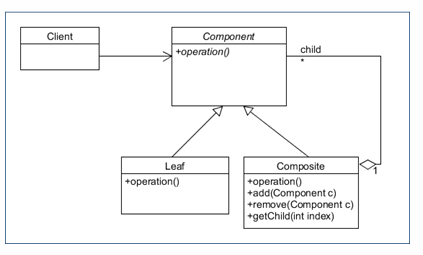
Composite Pattern
- 목적
각 객체를 동일한 인터페이스를 통해 독립적으로 또는 중첩 객체 집합으로 처리할 수 있는 객체 계층을
쉽게 만들 수 있음
- 사용시기
객체의 계층적 표현이 필요함
물체 및 물체의 구성은 균일하게 처리되어야 함
※ Hierarchical structure
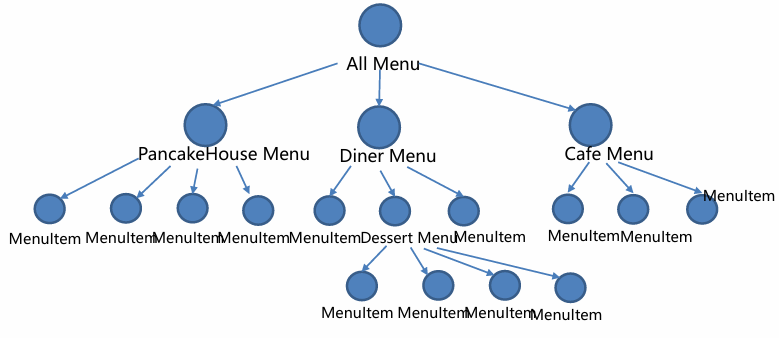
Menu 와 Menu 내에 존재하는 MenuItem 들에 대한 계층적 구조로는 위와 같다.
root 노드에는 All Menu로 하위 노드에 각 메뉴들이 연결되어 있다.
leaf 노드에는 각 메뉴의 아이템으로 특정 메뉴 노드와 연결되어 있다.
위와 같은 트리 구조를 균일하게 접근하기 위해서는 Compositie pattern 을 사용해야 한다.
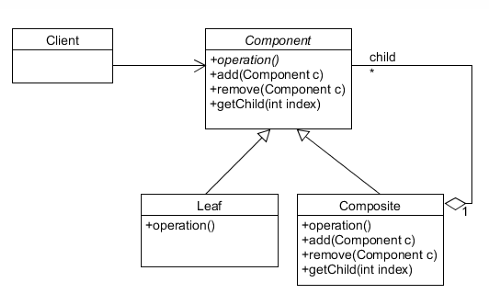
※ Component Class
public class MenuComponent {
	public void add(MenuComponent menuComponent) {
    	throw new UnsupportedOperationException();
    }
    public void remove(MenuComponent menuComponent) {
    	throw new UnsupportedOperationException();
    }
    public void getChild(int i) {
    	throw new UnsupportedOperationException();
    }
    public String getName() {
    	throw new UnsupportedOperationException();
    }
    public String getDescription() {
    	throw new UnsupportedOperationException();
    }
    public double getPrice() {
    	throw new UnsupportedOperationException();
    }
    public boolean isVegetarian() {
    	throw new UnsupportedOperationException();
    }
    public void print() {
    	throw new UnsupportedOperationException();
    }
}
컴포넌트 클래스로 이를 상속하는 Leaf, Composite 클래스를 살펴보도록 한다.
※ Leaf Class
public class MenuItem extends MenuComponent{
    String name;
    String description;
    boolean vegetarian;
    double price;

    public MenuItem(String name, String description, boolean vegetarian,
    	double price) {
    ...
    }
    public String getName() {
    	return name;
    }
    public String getDescription() {
    	return description;
    }
    public double getPrice() {
    	return price;
    }
    public boolean isVegetarian() {
    	return vegetarian;
    }
    public void print() {
    	System.out.print("  " + getName());
    	if (this.isVegetarian()) System.out.println("(v)");
    	System.out.println(", " + getPrice());
    	System.out.println("   --" + getDescription());
    }
}
MenuItem 에 대한 클래스로 MenuComponent 클래스를 상속한다.
리프 노드에 대한 클래스이기 때문에 MenuItem에 대한 상세한 정보를 관리한다.
※ Composite Class
public class Menu extends MenuComponent{
    ArraryList menuComponents = new ArrayList();
    String name;
    String description;

    public Menu(String name, String description) {
    	this.name = name;
    	this.description = description;
    }
    public void add(MenuComponent menuComponent) {
    	menuComponents.add(menuComponent);
    }
    public void remove(MenuComponent menuComponent) {
    	menuComponents.remove(menuComponent);
    }
    public MenuComponent getChild(int i) {
    	return (MenuComponent)menuComponents.get(i);
    }
    public String getName() { return name; }
    public String getDescription() { return description; }
    public void print() {
        Iterator iterator= menuComponents.iterator();
        while (iterator.hasNext()) {
        	MenuComponent menuComponent = (MenuComponent)iterator.next();
        	menuComponent.print();
        }
    }
}
Menu에 대한 클래스로 마찬가지로 MenuComponent 를 상속한다.
MenuItem 또는 Menu 를 자식 노드로 관리하기 때문에, 컴포넌트들을 관리하는 ArrayList 가 있다.
print() 메서드의 경우 MenuItem 과 다르게 여러 개의 컴포넌트가 있기 때문에,
Iterator 객체를 활용하여 각 컴포넌트에 대한 객체를 가져와서 해당 객체의 print() 메서드를 호출하게 된다.
Leaf 노드의 print() 가 호출될 경우 MenuItem 에 대한 상세한 정보가 출력될 것이고,
Menu 에 대한 print() 가 다시 호출될 경우 보유하고 있는 컴포넌트들에 대한 print() 메서드를 호출할 것이다.
※ Waitress Class (Client using Composite Pattern)
public class Waitress {
    MenuComponent allMenus;

    public Waitress(MenuComponent allMenus) {
    	this.allMenus = allMenus;
    }
    public void printMenu() {
    	allMenus.print();
    }
}
root 노드를 관리하는 클래스 Waitress 이다.
생성자를 통해 root 노드에 해당하는 MenuComponent 객체를 받아오고,
해당 객체의 print() 메서드를 호출하면 모든 Menu가 가지고 있는 MenuItem 들을 출력하게 된다.
※ Test Drive Code
public class MenuTestDrive{

    public static void main(String args[]) {
        // mid-level Menu
        MenuComponent pancakeHouseMenu = new Menu("PANCAKE HOUSE MENU", "Breakfast");
        MenuComponent dinerMenu = new Menu("DINER MENU", "Lunch");
        MenuComponent cafeMenu = new Menu("CAFE MENU", "Dinner");

        // adding mid-level Menus to root-level Menu
        MenuComponent allMenus = new Menu("ALL MENUS", "All menus combined");
        allMenus.add(pancakeHouseMenu);
        allMenus.add(dinerMenu);
        allMenus.add(cafeMenu);

		// adding bottom-level Menu to mid-level Menu
        MenuComponent dessertMenu = new Menu("DESSERT MENU", "Dessert of course!");
        dinerMenu.add(dessertMenu);

        // adding MenuItemsto Menus
        pancakeHouseMenu.add(new MenuItem( "K&B's Pancake Breakfast",
        	"Pancakes with scrambled eggs, and toast", true, 2.99));
        pancakeHouseMenu.add(new MenuItem( "Regular Pancake Breakfast",
        	"Pancakes with fried eggs, sausage", false, 2.99));

        … adding more MenuItems…

        Waitress waitress = new Waitress(allMenus);
        waitress.printVegetarianMenu();
    }
}
위와 같이 Menu와 MenuItem을 추가하는 코드를 작성할 수 있다.
root 노드를 관리하는 객체인 waitress에서 printVegetarianMenu() 메서드를 호출하여
vegetarian 에 해당하는 MenuItem 만 출력될 수 있도록 Waitress 클래스를 수정해보도록 한다.
public class Waitress {
    MenuComponent allMenus;

	public Watiress(MenuComponent allMenus) {
    	this.allMenus = allMenus;
    }
    public void printMenu() {
    	allMenus.print();
    }
    public void printVegetarianMenu() {
        Iterator iterator = allMenus.createIterator();
        System.out.println("VEGETARIAN MENU-------");
        while (iterator.hasNext()) {
            MenuComponent menuComponent = (MenuComponent)iterator.next();
            try {
            	if (menuComponent.isVegetarian()) menuComponent.print();
            } catch (UnsupportedOperationException e) {}
        }
    }
}
printVegetarianMenu() 메서드는 해당 Menu 또는 MenuItem이 vegetarian 인지 아닌지에 따라서
컴포넌트를 출력하도록 코드가 작성되어 있다.
Menu의 경우 위 코드에서 isVegetarian() 이 구현되어 있지 않아서 exception을 던지므로 catch 에 들어가며,
MenuItem의 경우 isVegetarian() 이 구현되어 있어서 여부에 따라 출력이 결정된다.
※ Simulate the Algorithm
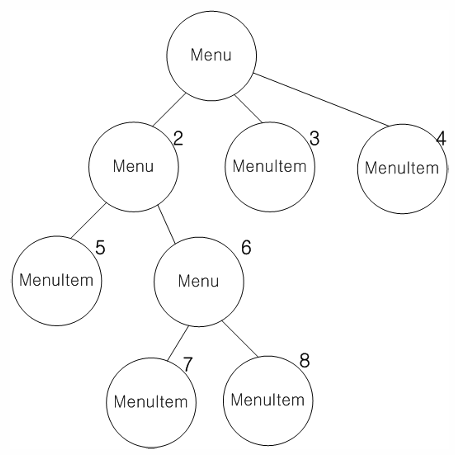
위와 같이 컴포넌트가 구성되어 있다고 할 때, 루트 Menu 에서 print() 메서드를 호출할 때의 방문 순서는 아래와 같다.
방문 순서: 2 -> 5 -> 6 -> 7 -> 8 -> 3 -> 4 (전위 순회)
※ Where to place Child Mgt. Interface?
컴포넌트 클래스에 배치하면 투명성이 부여된다.
모든 컴포넌트를 동일하게 취급할 수 있지만 안전하지 않다.
클라이언트들은 런타임에 컴포넌트를 제거하는데 의미 없는 작업을 시도할 수 있다.
Composite 클래스에 배치하면 안전성이 부여된다.
리프 성분에 자식 연산을 수행하려는 시도는 컴파일 타임에 잡히기 때문이다.
하지만 리프 성분과 복합 성분의 인터페이스가 다르기 때문에 투명성을 잃게 된다.
(내 생각엔 이 구조가 더 좋은듯)
※ Composite v.s. Decorator
- 공통점
둘 다 유사한 구조 다이어그램을 가지고 있음
객체의 개방된 수를 정리하기 위한 재귀적 구성으로 이뤄짐
- 차이점
Decorator를 사용하면 하위 분류 없이 객체에 책임을 추가할 수 있음
Composite의 초점은 장식이 아니라 표현에 있음
두 패턴이 서로 상호 보완적임
'Design Patterns' 카테고리의 다른 글
| Bridge Pattern (0) | 2024.06.24 |
|---|---|
| Adapter Pattern (0) | 2024.06.09 |
| Decorator Pattern (0) | 2024.06.09 |
| Singleton Pattern (1) | 2024.06.09 |
| Builder Pattern (0) | 2024.06.09 |


